
One of my son’s closest friends happens to be of Lebanese descent. The first time my son went over to his friend’s, he returned home and exclaimed rhetorically “Why can’t you make food like theirs?” I didn’t have much a choice; this one question set into motion the quest to add a few more recipes to our arsenal.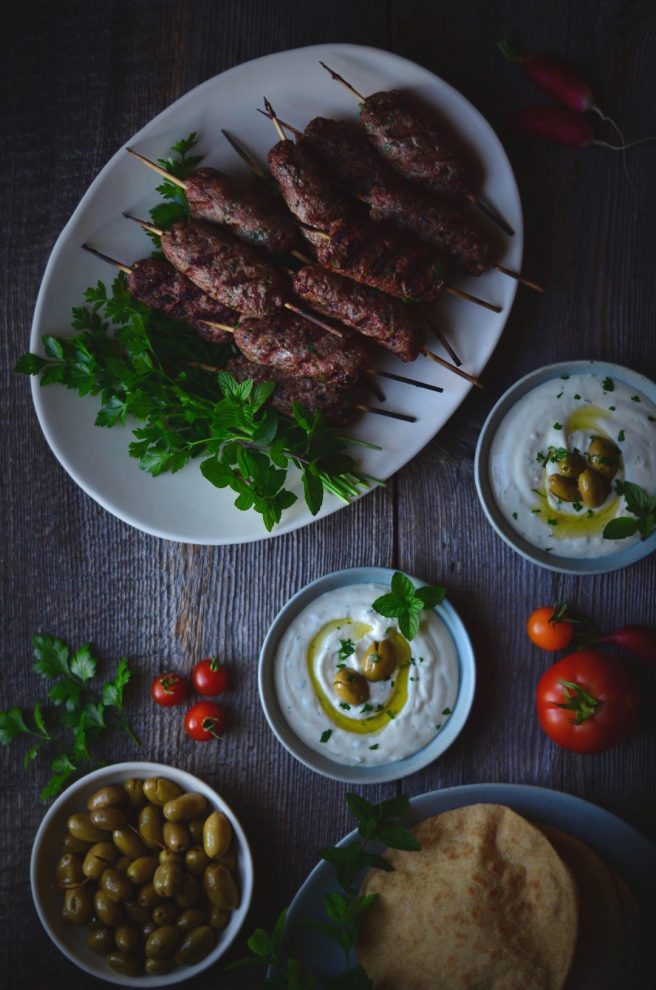 I didn’t get an exact recipe from my son’s friend’s mom, only an “approximate” one similar to the type I’d get from my own parents. But that, together with a little help from David Lebovitz’s post here, we’ve finally settled on a winsome meal.
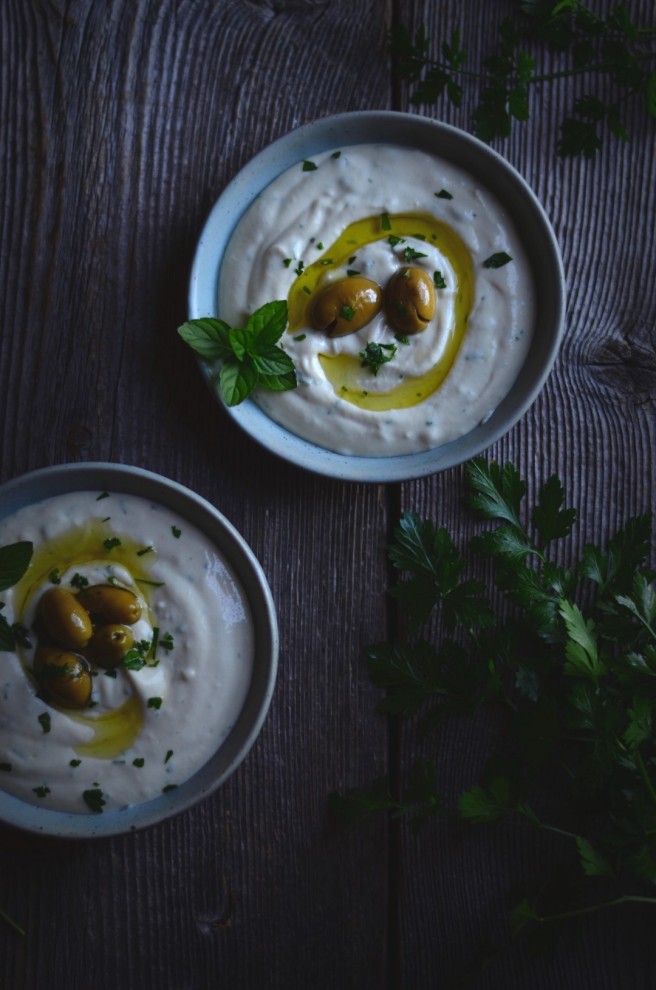
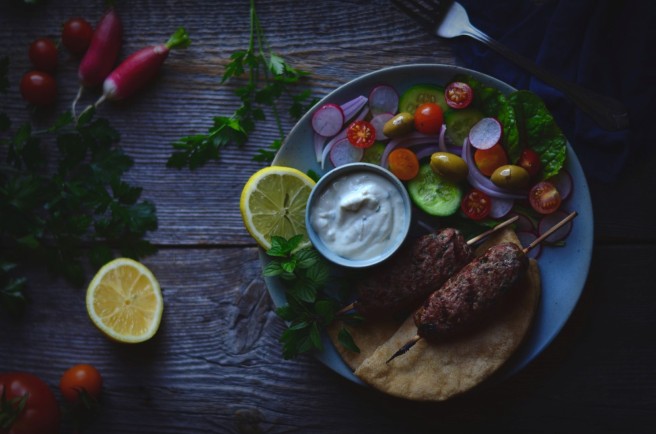
Middle Eastern Grilled Lamb Kafta
(yields about 8-9 kaftas)
- 450 g boneless lamb pieces
- 75 grams onions (about 1 large), minced
- 12 g garlic (about 2-3 cloves)
- 1/8 cup packed fresh parsley leaves
- 1/8 cup packed fresh coriander leaves
- 1 tbsp packed fresh mint leaves
- 1 tsp salt
- 1 tsp ground cinnamon
- 1 tsp cumin powder
- 1 tsp paprika
- 1/4 tsp coriander powder
- 1/4 tsp ground black pepper
- a pinch of cayenne pepper
- Pass lamb, onions, garlic, parsley leaves, coriander leaves, and mint leaves through a meat grinder. (Alternatively, if you are using pre-ground lamb, then finely mince the onion, garlic and herbs and mix with the lamb.)
- Mix in the salt and spices to the ground mixture.
- Using your hands, shape a fistful of mixture (about 65 g) into a ball and then roll it to elongate it to about 3 inches in length. Poke the kafta lengthwise with a pre-soaked wooden skewer.
- Repeat with the remaining mixture.
- Turn on grill and allow it to heat to medium heat (300º F).
- Place all the kaftas on grill and let sear (2 to 3 minutes). One by one, using a sharp metal spatula and a metal tong, turn each kafta about 1/4 way and grill 5 minutes. Continue turning and grilling until all sides are browned and kaftas are well cooked inside (total cooking time is about 25 minutes). Using a meat thermometer, the inside temperature of the kafta should be at least 170º F.
Lemony Tahini Yogurt Sauce
(serves 4)
- 160 g yogurt
- 100 g tahini
- 2 tbsp lemon juice
- 8 g (about 2 small) garlic cloves, minced
- 2 tsp fresh parsley leaves, minced
- 1/4 tsp salt
- pinch of cayenne pepper (optional)
- Combine yogurt, tahini and lemon juice. Using an immersion blender, simplifies this step.
- Mix in garlic, parsley, salt and cayenne pepper (if using). Drizzle with olive oil and fresh chopped parsley when serving.
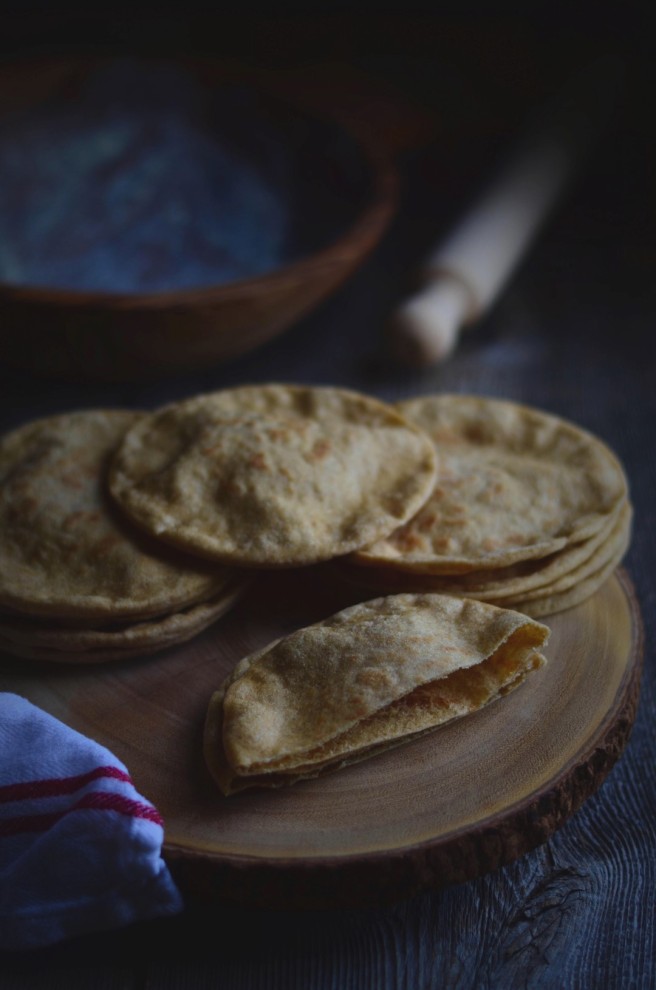
Whole Wheat Pita Bread
(yields 8 thin pitas as in the photos or 4 thick pitas)
- 195 g (or 1 1/2 cups) whole wheat flour (I use 2/3 white whole wheat flour and 1/3 brown whole wheat flour)
- 2 tbsp olive oil
- 1 tsp salt
- 1 tsp yeast
- 1 tsp honey (or sugar)
- Add yeast and honey to 118 g (1/2 cup) warm water and allow to proof.
- In the meantime, combine flour and salt in a dough bowl. Using your hand, mix in oil.
- Add the yeast mixture to the flour and again using your hand, mix to form the dough. You may need to add 2-3 tbsp of additional water to get a soft, unsticky dough. If the dough feels too sticky, putting oil on your hands will help. If it is really too sticky, just add additional flour. Knead the dough for about 5 minutes.
- Allow the dough to rise in a greased bowl for at least 2 hours in a warmed oven or a sunny spot.
- Once the dough has risen to about double the size, push down and knead for a few minutes. Divide the dough into 8 equal balls. (For me the total dough weighed 375 g, each ball was about 46 g).
- On a floured surface, roll out each ball. Be careful when rolling so that no folds occur. Each pita should be about 5.5 inches or 14 cm. Place on a dry tea towel. Do not overlap them and keep covered with another dry tea towel.
- Heat a cast iron skillet on the stove top (at least 5 minutes on low-medium heat setting). Place one pita on the hot skillet and put a timer on for 2 minutes. Bubbles will form on the top surface and eventually, the whole top surface will rise to form a ball. By the end of the two minutes, the surface will be lightly browned. If the skillet was not sufficiently hot, it will take longer to brown, continue to cook for 1-2 more minutes.
- Flip the pita and cook on the other side for another 2 minutes, until browned on the second side as well.
Note 1: If the pita does not automatically puff into a ball, you can coax it by applying a light pressure on the part of the pita where it did rise using a flat metal spatula. Be careful to not push too hard as that will cause the bubble to burst and the escaping steam can burn you. If you can’t get it to puff into a ball, no worries, you can still eat it!
Note 2: Using 100% white whole wheat flour makes a dough that is really soft and slightly more difficult to work with. For this reason, I use 2/3 white whole wheat flour and 1/3 brown whole wheat flour. You can most certainly use 100% brown whole wheat flour as well.

I’m so glad I already ate dinner because looking at these would send me into overdrive. Yum!
Haha.. I totally know what you mean… the number of times I’ve had to go in search of food while looking at my Instagram feed!
WOW I am definitely trying this!
I hope you do… it’s a winner here!
Awesome recipe…..I have to try it 🙂
Thank you!
So much work to make even the pita bread from scratch!! Looks delicious as always! xx
You are right… the pita bread is quite a bit of work but once you taste it fresh off the stove you realize it is worth it. Making the kaftas and the sauce is pretty easy in comparison so it balances out!
Don’t worry. I’m sure your son’s friends say the same to their parents about your food. You’re cooking and pictures always look great!
Haha.. you are actually right! The number of times parents ask me for a particular recipe is a good indication. I guess kids, like adults, get tired of eating the same old thing and find pleasure in new flavours!
This looks so delicious!
Thank you Ursula!
This looks lovely Annika – middle eastern flavours are so good!
Thank you dear Laura. You are right, I’m not a meat eater but I do appreciate the flavours of this meal.
Now I bet your son is not complaining any more 😉 It looks delicious!
Haha! No, not at all… this is one of his favourite meals!
This is simply amazing my dear friend. Can’t wait to try and thank you so much for sharing.
Thank you Myra!
Sounds Scrumptious lamb recipe.
Thank you!
Ohh my gosh this is one of the best looking/sounding meals ever 😍😍 thank you for sharing the recipes 💙
Thank you Linda… I had to photograph this one quickly as everyone here was getting impatient to eat!
This is an absolute stunner
Thank you!
Looks great! Excited to try 🙂
Thank you! I do hope you try it and enjoy it as much as my family!
That’s awesome that you took the time to learn how to cook this type of food for your son. Everything looks delicious!
Thank you. I love cooking for my family and getting a thumbs up when they taste something new… best reward ever!
Yes; this looks absolutely wonderful!
Thank you1